Very often during development, it is useful to run your code in a scenario that is as near to a final deployment as possible, but not in some cloud environment where it’s hard to change specific parts without going through the full CI/CD chain. I find it very useful to quickly build, run, iterate, rebuild, and rerun VMs with NixOS Linux on my development machines. This week I demonstrate this aspect of my workflow with NixOS.
Let’s look at a distinct part of another project I was involved in this year: Setting up an MQTT message passing engine, providing users a low-code drag-and-drop interface to produce data, and later postprocess it in some other code modules that I developed on top of that. I surely had an idea how the system modules stack on top of each other to facilitate the right data flow, but I first had to learn how to configure and use the needed system services as I did not use them before. While doing so, I wanted to evolve the system configuration from a quick-setup and maximum-experimentability scenario towards a secure production-ready configuration. I develop my code on an x86_64 laptop, but it would be finally deployed on a Raspberry Pi 4.
Creating the VM
The development approach that often helps is a “deploy first” workflow where software modules are developed backwards from a deployment that consists of as many standard components as possible, where the custom software is developed last to fill the gaps.
So let’s start by defining a NixOS Linux VM that runs the
Mosquitto MQTT Message Broker service, and then see
how we can extend it.
To do so, we define a file mqtt-vm.nix and define all the configuration
inside:
# file: mqtt-vm.nix
let
  pkgs = import <nixpkgs> { };

  # This module defines the system that we want
  mqttModule = { ... }: {
    # Enable mosquitto without any authentication for the beginning, as also
    # documented in the NixOS documentation:
    # https://nixos.org/manual/nixos/stable/index.html#module-services-mosquitto
    services.mosquitto = {
      enable = true;
      listeners = [ {
        acl = [ "pattern readwrite #" ];
        omitPasswordAuth = true;
        settings.allow_anonymous = true;
      } ];
    };
  };

  # This module describes the part of the system that only makes sense in our
  # test VM scenario, like empty root password and port forward rules.
  debugVm = { modulesPath, ... }: {
    imports = [
      # The qemu-vm NixOS module gives us the `vm` attribute that we will later
      # use, and other VM-related settings
      "${modulesPath}/virtualisation/qemu-vm.nix"
    ];

    # Forward the hosts's port 2222 to the guest's SSH port.
    # Also, forward the MQTT port 1883 1:1 from host to guest.
    virtualisation.forwardPorts = [
      { from = "host"; host.port = 2222; guest.port = 22; }
      { from = "host"; host.port = 1883; guest.port = 1883; }
    ];

    # Root user without password and enabled SSH for playing around
    networking.firewall.enable = false;
    services.openssh.enable = true;
    services.openssh.permitRootLogin = "yes";
    users.extraUsers.root.password = "";
  };

  nixosEvaluation = pkgs.nixos [
    debugVm
    mqttModule
  ];
in

nixosEvaluation.config.system.build.vm
All the attribute paths that we use here can be looked up in the search.nixos.org tool, where we get explanations, example values, and links to the source code of the module definitions.
The pkgs.nixos function that we call in the end accepts a list of NixOS
modules and returns a attribute set that contains many derivations which form
parts of a NixOS system, but can also contain the end-results like ISO-images,
VM-images, etc.
The system.build.vm attribute that we finally emit from the whole nix
expression comes from our import of the virtualisation/qemu-vm.nix module.
Other modules may emit images for netboot, USB sticks, cloud VMs, etc.
The mqttModule describes the application-specific part of our NixOS system
and debugVm describes the test-VM-specific part of it.
Having both system modules split up like this, we can later easily separate them
into different files for reuse.
We can evolve mqttModule towards a secure, production-ready configuration and
use it in both our deployments but also toy development VMs for quick
experimentation.
Let’s build and run it:
$ nix-build mqtt-vm.nix
/nix/store/w4w6qy2dab7qq5a5xhf5601nkxkgspf7-nixos-vm
$ ./result/bin/run-nixos-vm

# or in one command:

$ $(nix-build mqtt-vm.nix)/bin/run-nixos-vm
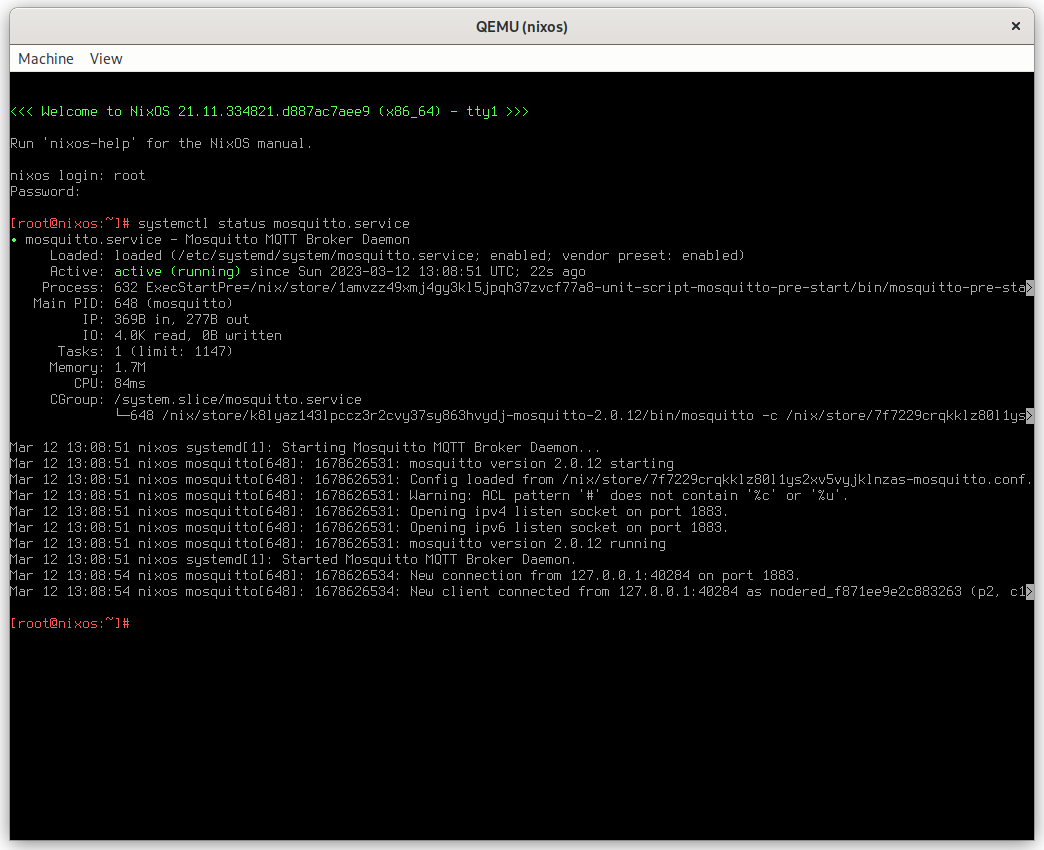
Now we can watch the VM boot and then play around with it:

Of course, we can minimize the window and login via SSH:
$ ssh -p 2222 root@localhost "systemctl status mosquitto.service"
(root@localhost) Password:
● mosquitto.service - Mosquitto MQTT Broker Daemon
     Loaded: loaded (/etc/systemd/system/mosquitto.service; enabled; vendor preset: enabled)
     Active: active (running) since Sun 2023-03-12 13:26:54 UTC; 2min 16s ago
...
Posting new test messages into the Mosquitto engine via the terminal is done
with the command mosquitto_pub -h localhost -t test -m "Hello".
The command mosquitto_sub -h localhost -t test prints new incoming messages.
Extending the VM
Let’s say we played around enough with the Mosquitto service and and now want to continue with some sophisticated message processing dashboard experiments using Node-RED. We don’t even need to “throw away” the old VM, as we will see.
We edit the mqttModule attribute that we created earlier by adding Node-RED.
  mqttModule = { ... }: {
    services.mosquitto = {
      enable = true;
      listeners = [ {
        acl = [ "pattern readwrite #" ];
        omitPasswordAuth = true;
        settings.allow_anonymous = true;
      } ];
    };

    # Add this line
    services.node-red.enable = true;
  };
In addition to that, we also want to forward Node-RED’s HTTP port:
  virtualisation.forwardPorts = [
    ..
    { from = "host"; host.port = 1880; guest.port = 1880; }
    ...
  ];
We can stop the existing VM and rebuild and rerun it with the same command as before. The build output shows that nix is only downloading and building the parts of the VM that need to be changed due to our little additions.
Nix does not have to rebuild the VM disk image, because it never created one in
the first place:
The system consists of virtual file systems that practically just mount some
host folders together to manifest our NixOS configuration for the VM!
(Just open result/bin/nixos-run-vm in a text editor and see yourself)
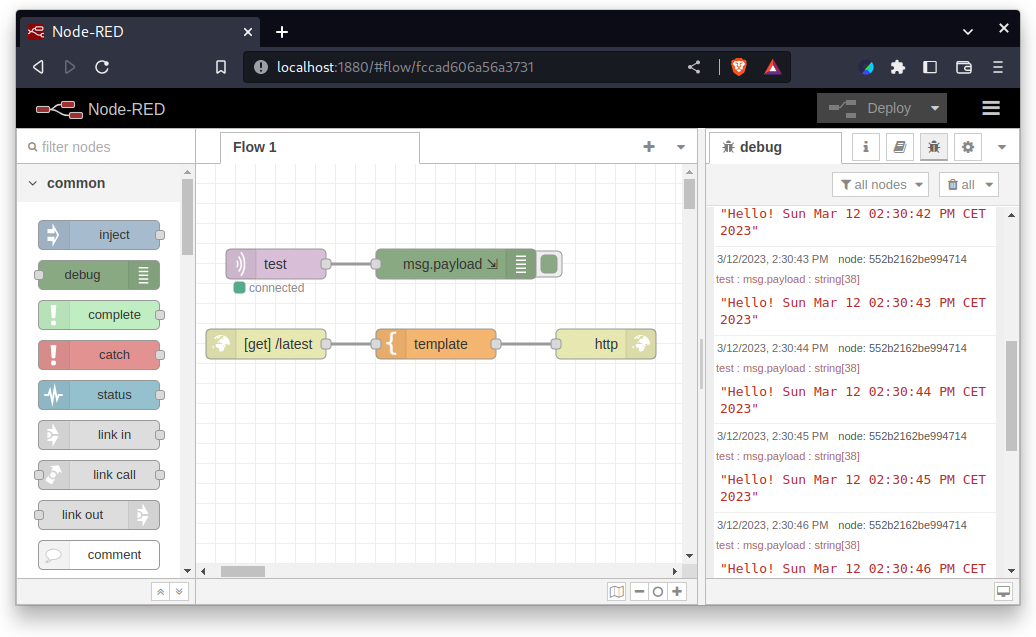
Now, we can program message systems using drag and drop in the browser:

We can wildly add and remove things from the system configuration and try it out immediately, without any harm. When the standard components are set up, I typically use this as a starting point to develop my own configurable NixOS modules on top of that.
As soon as something works well, it can be committed with the code base and transformed into the blueprints of real integration tests and production deployments.
Summary
I find this way to work with complex services much more portable than writing long docker-compose files that still don’t give me the amount of control that I wish for experimentation.
Also, it is easy to keep the state of the VM between system rebuilds.
The generated VM run script makes qemu create a nixos.qcow2 disk image that
does not keep the system packages and configuration, but the state that the
services create over their lifetime.
In this case, this is the MQTT database and the Node-RED dashboard settings.
If the state gets weird because I did the wrong things, i typically just delete
the state image file, reboot and get a fresh initialized system.
The scenario in this article is really simple, and I hope it is obvious that it is simple to evolve it up to random levels of complexity without any hassle, which facilitates developing software with their actual later deployment in mind.
If you happened to like this article or need some help with Nix/NixOS, also have a look at my corporate Nix & NixOS Trainings and Consulting Services.